
¶ Introduction
The Unicorn Chasing Kit is a resonance compensation toolkit centred around two core components: the Rethonance Nozzle, a V6-compatible nozzle with a built-in ADXL345 accelerometer and the Rethonance Hub, a magnetic, bed-mountable board that consolidates connectivity for ADXL sensors, motor thermistors, and a GPIO extension port — all over a single USB connection. Together, they provide a convenient way for users to precisely measure resonance at where it actually matters - the nozzle.
¶ Features
- V6 Compatibility, the Rethonance Nozzle is compatible with any hotend that accepts V6 hotends.
- USB Klipper connection, the Rethonance Hub connects to the Raspberry Pi via standard USB connection, making setup easy and quick.
- Dual ADXL ports, the Rethonance Nub allows for two ADXL boards to be connected simultaneously.
- 4X Thermistor ports, useful for monitoring motor temperature or chamber temperature.
- GPIO extension port, an extension port that allows users to expand the functionality of the Rethonance Hub.
¶ System Overview
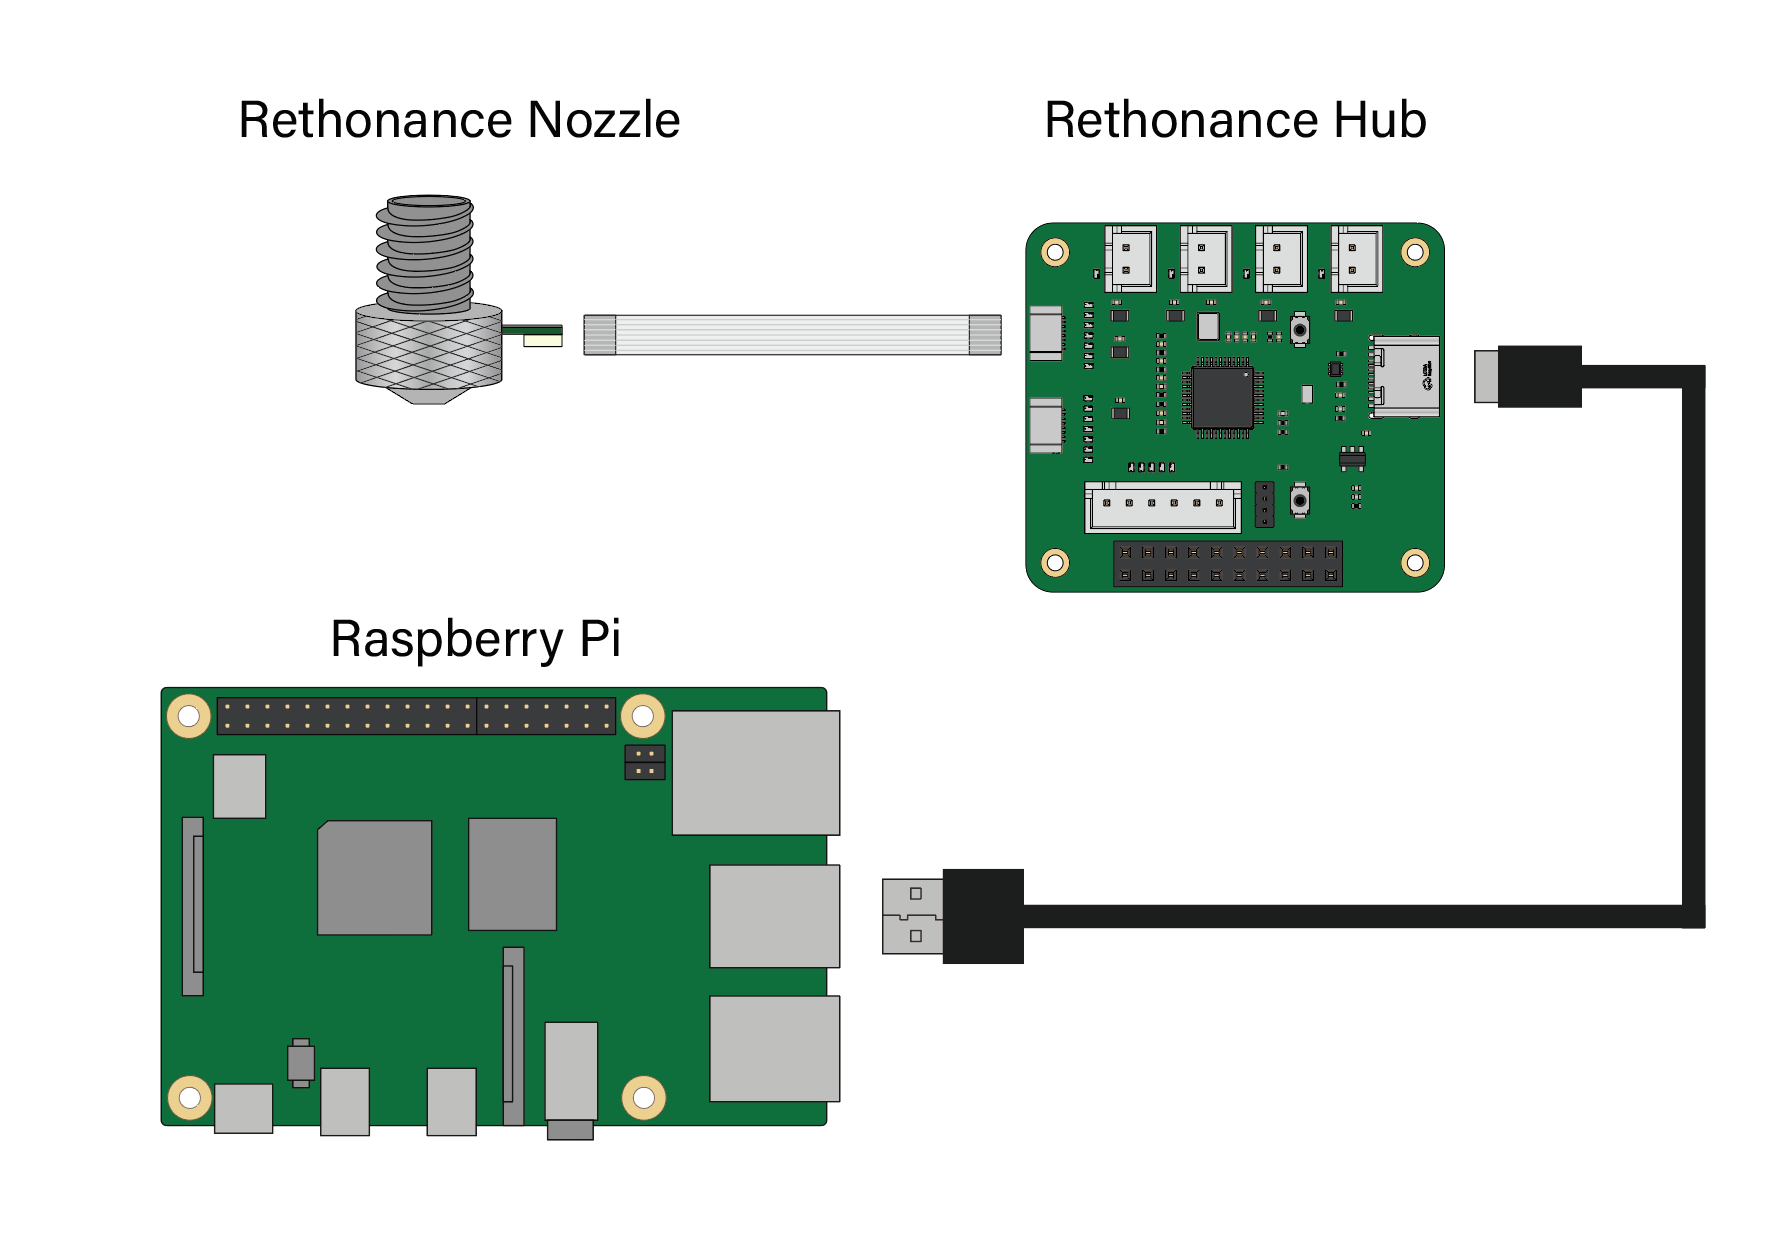
The Unicorn Chasing Kit consists of the Rethonance Nozzle and Hub along with related cables. A simplified wiring diagram is shown below:
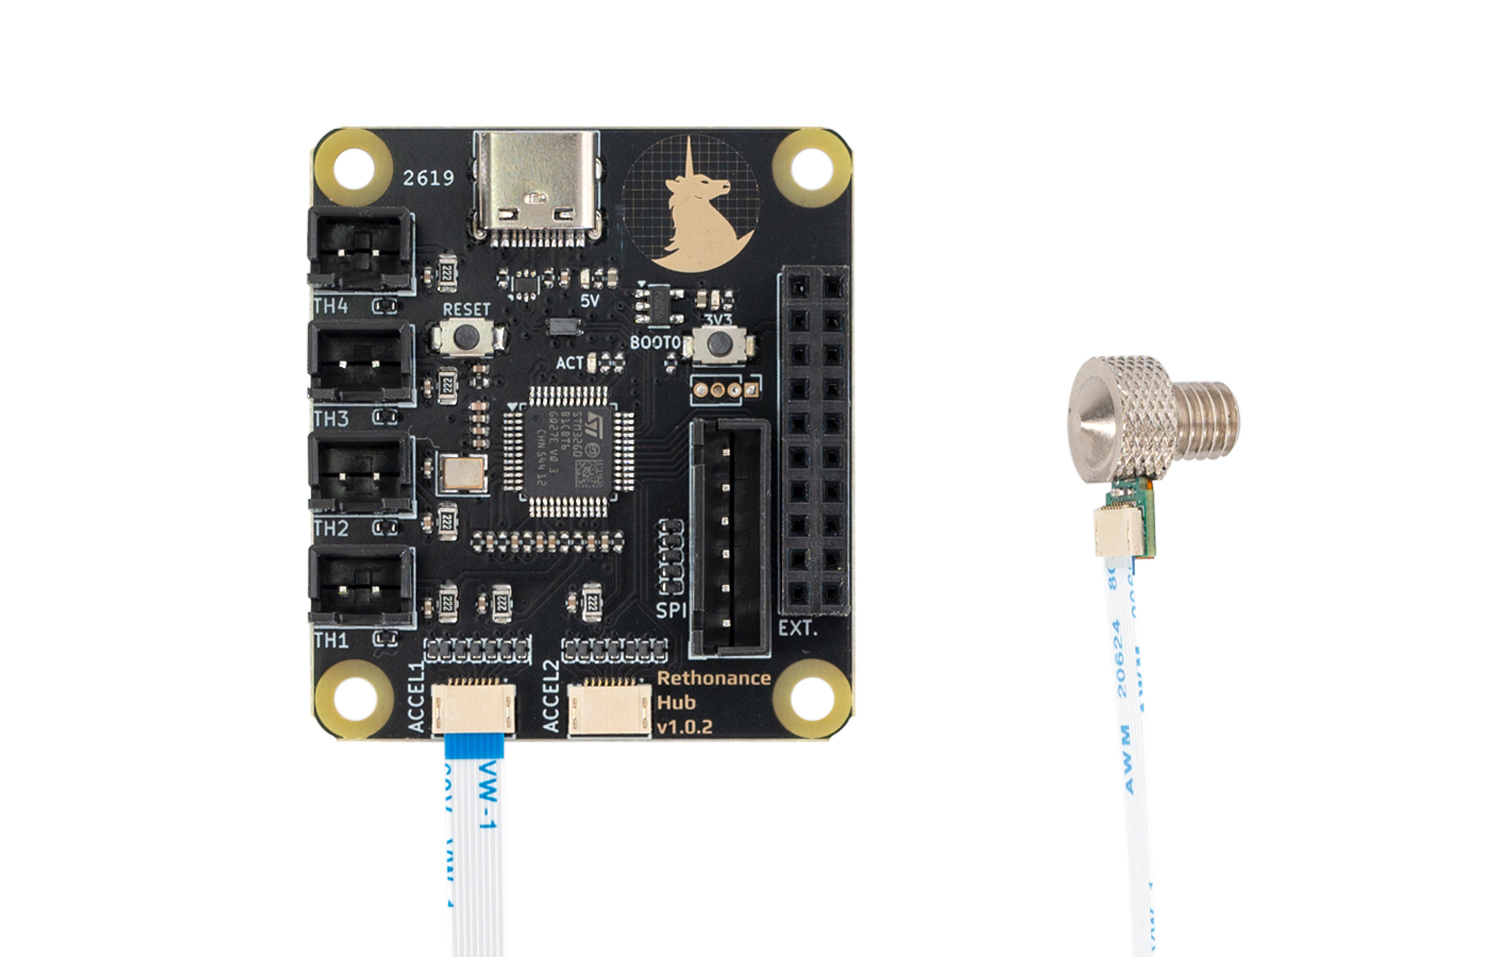
- Rethonance Nozzle, This is the nozzle accelerometer that can be screwed on to the hotend.
- Rethonance Hub, This is a bed mountable board with an onboard STM32G0B1 microcontroller. The hub connects acts as an intermediary between the Rethonance Nozzle and Raspberry Pi. It features two accelerometer ports as well as four thermistor ports and an extension port.
- FFC Cable, this is a standard FFC flex cable that connects the Rethonance Nozzle to the Hub. The cable is lightweight so as to not affect resonance readings. It is also low cost and easily replaceable if needed.
- USB A to C Cable, this standard USB cable connects the Rethonance Hub to the Raspberry Pi.
¶ Printed Parts
The Rethonance Hub is designed to be installed on a simple printed mount. The mount allows the hub to be easily placed and removed on the heatbed as needed. The mount includes three magnets that allow it to be latched to the flex plate when in operation. The printed parts are available in here https://github.com/MotorDynamicsLab/Rethonance/tree/master/STLs. The CAD file for the Hub is also available on github to allow anyone to design custom mounting solutions.
¶ Klipper Config Files
A Klipper Configuation can be found in the Rethonance github repo here. Most ports in the configuration file are commented out, remember to enable any port that you want to use.
¶ Hub Port and Pin Definitions
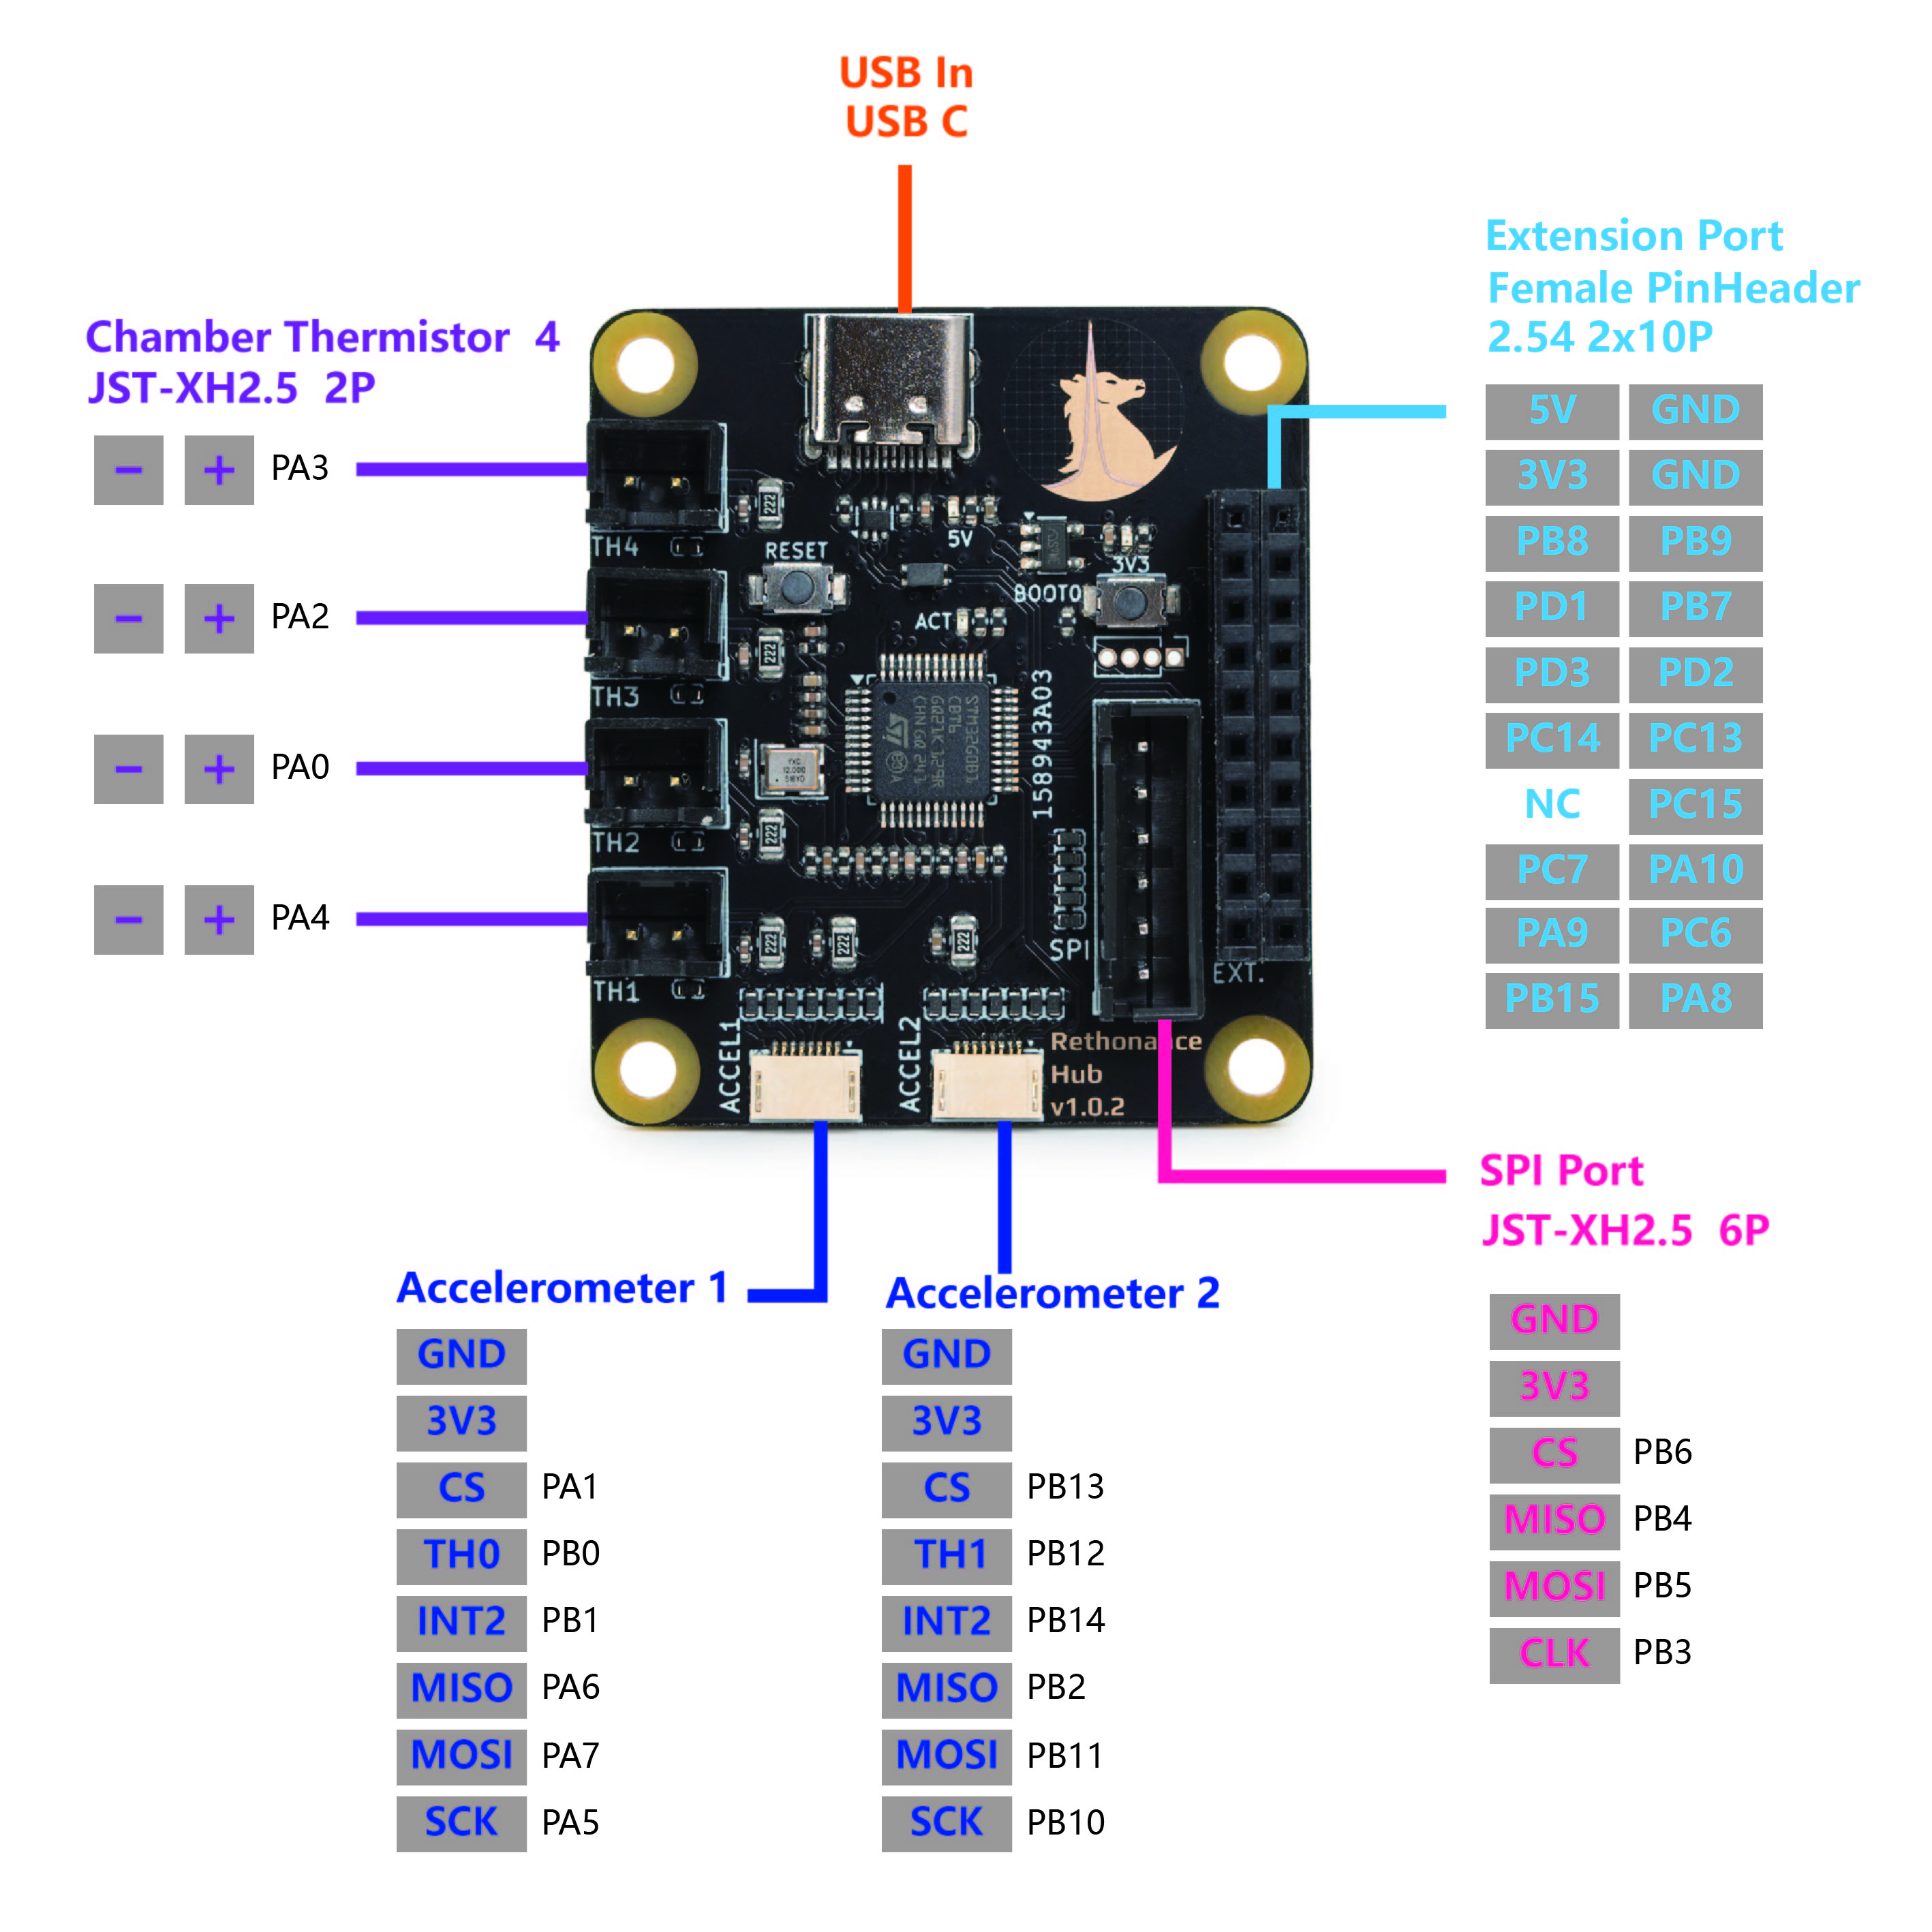
| Device/Port | PCB Label | Connector Type | MCU Pin | Description |
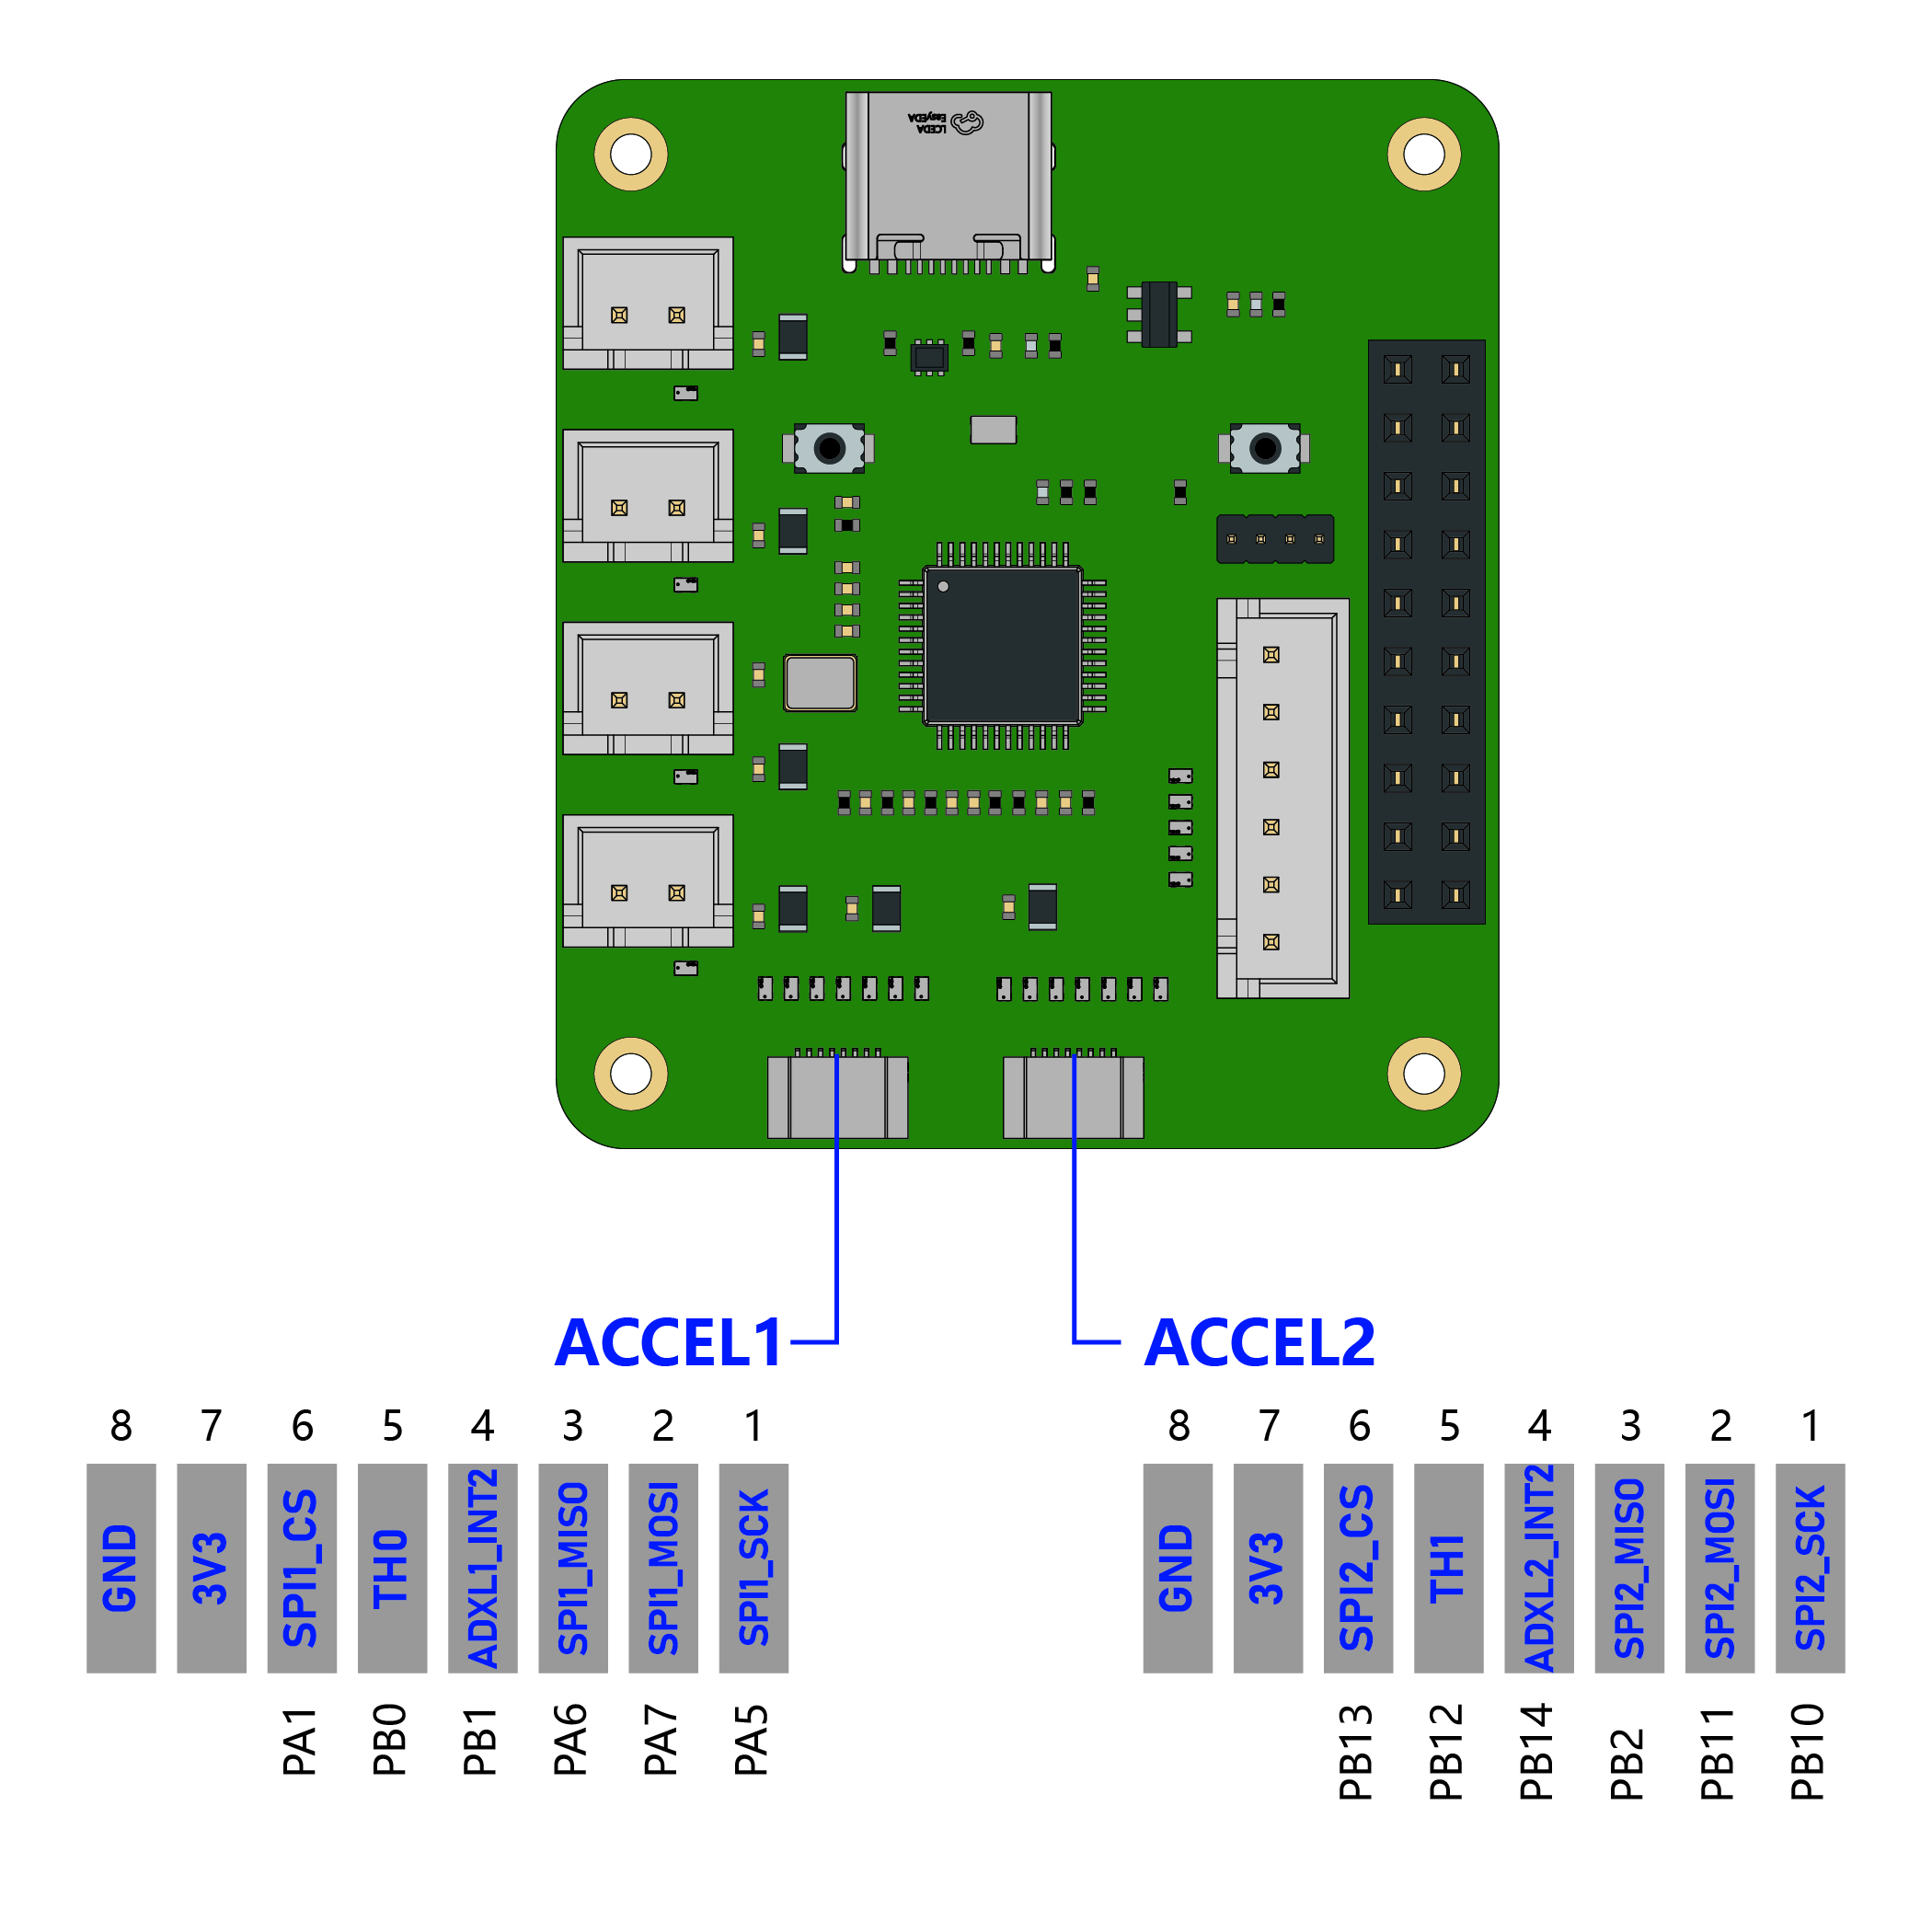
| Accelerometer Port 1 | ACCEL1 | FFC 0.5mm 8P | PA1/PA5/PA7/PA6/PB0 (cs/clk/mosi/miso/therm) | Accelerometer for input shaping. Controlled via hardware (spi1_PA6_PA7_PA5) or software SPI. |
| Accelerometer Port 2 | ACCEL2 | FFC 0.5mm 8P | PB13/PB10/PB11/PB2/PB12 (cs/clk/mosi/miso/therm) | Accelerometer for input shaping. Controlled via hardware (spi2_PB2_PB11_PB10) or software SPI. |
| Thermistor 1 | TH1 | JST-XH 2P | PA4 | Connect to the thermistor. Uses a 2.2kΩ pull up resistor. |
| Thermistor 2 | TH2 | JST-XH 2P | PA0 | Connect to the thermistor. Uses a 2.2kΩ pull up resistor. |
| Thermistor 3 | TH3 | JST-XH 2P | PA2 | Connect to the thermistor. Uses a 2.2kΩ pull up resistor. |
| Thermistor 4 | TH4 | JST-XH 2P | PA3 | Connect to the thermistor. Uses a 2.2kΩ pull up resistor. |
| SPI Port | SPI | JST-XH 6P | PB6/PB3/PB5/PB4 (cs/clk/mosi/miso) | Auxiliary SPI port, for use with any SPI device. |
| Extension Port | EXT | JST-XH 2x10P | ||
| Activity LED | ACT | N/A | PD0 | A small software controlled onboard LED. Active low. |
¶ ACCEL Port Pinout and Compatibility
The following pinout is common amongst the Rethonance Hub, Rethonance V6 Nozzle, Rethonance Revo Nozzle, and the original LDO Input Shaper Kit.
| PIN# | Name | Description |
| 1 | SCK | SPI clock line |
| 2 | MOSI | SPI master out slave in line |
| 3 | MISO | SPI master in slave out line |
| 4 | INT2 | ADXL345 int2 signal |
| 5 | TH/INT1 | Thermistor / ADXL345 int1 signal* |
| 6 | CS | SPI chip select line |
| 7 | 3V3 | 3V3 Supply (Supplied by Hub) |
| 8 | GND | Ground |
*int1 signal is only available in the original LDO input shaper board. Other boards use this pin as a thermistor signal
¶ FFC Orientation
The following shows the orientation in which the kit supplied ribbon cable should be inserted:
The FFC connector used in this kit allows you to insert the cable in either orientation (with the blue stiffener facing either up or down). The pinout is designed so that seating the ribbon cable in the wrong orientation will not result in any damage to the electronics. If you use an ribbon cable not supplied by the kit, simply keep trying different orientations until the LED on the Rethonance Nozzle lights up.
¶ Recommended FFC Cable Specifications
The kit provides a 400mm length FFC cable. Follow the below specifications if you need to purchase a new one or a longer cable.
| Pitch | 0.5mm |
| Positions | 8P |
| Type | 2 (exposed contacts on opposite sides)* |
| Length | < 1000mm |
*Type 1 FFC cables are also useable, but you will need to insert one end of the cable in a different orientation. Refer to the section above about orientation.
¶ Firmware Setup and Update
The firmware for the Rethonance Hub consists of two components: Katapult and Klipper. Katapult is a bootloader designed specifically for Klipper, it ensures that the software on the STM32 MCU boots up smoothly and allows for easy updating of the Klipper firmware. You can learn more about Katapult here. Klipper is the main firmware that runs on the STM32 MCU, you can learn more here.
Your Rethonance Hub will come shipped with both Katapult and Klipper installed. Ideally, you will only ever need to occasionally update the Klipper firmware and never have to touch Katapult. If the Katapult bootloader was erased or is not present for any reason, you can check this section for instructions on how to reupload Katapult.
¶ Hardware Setup
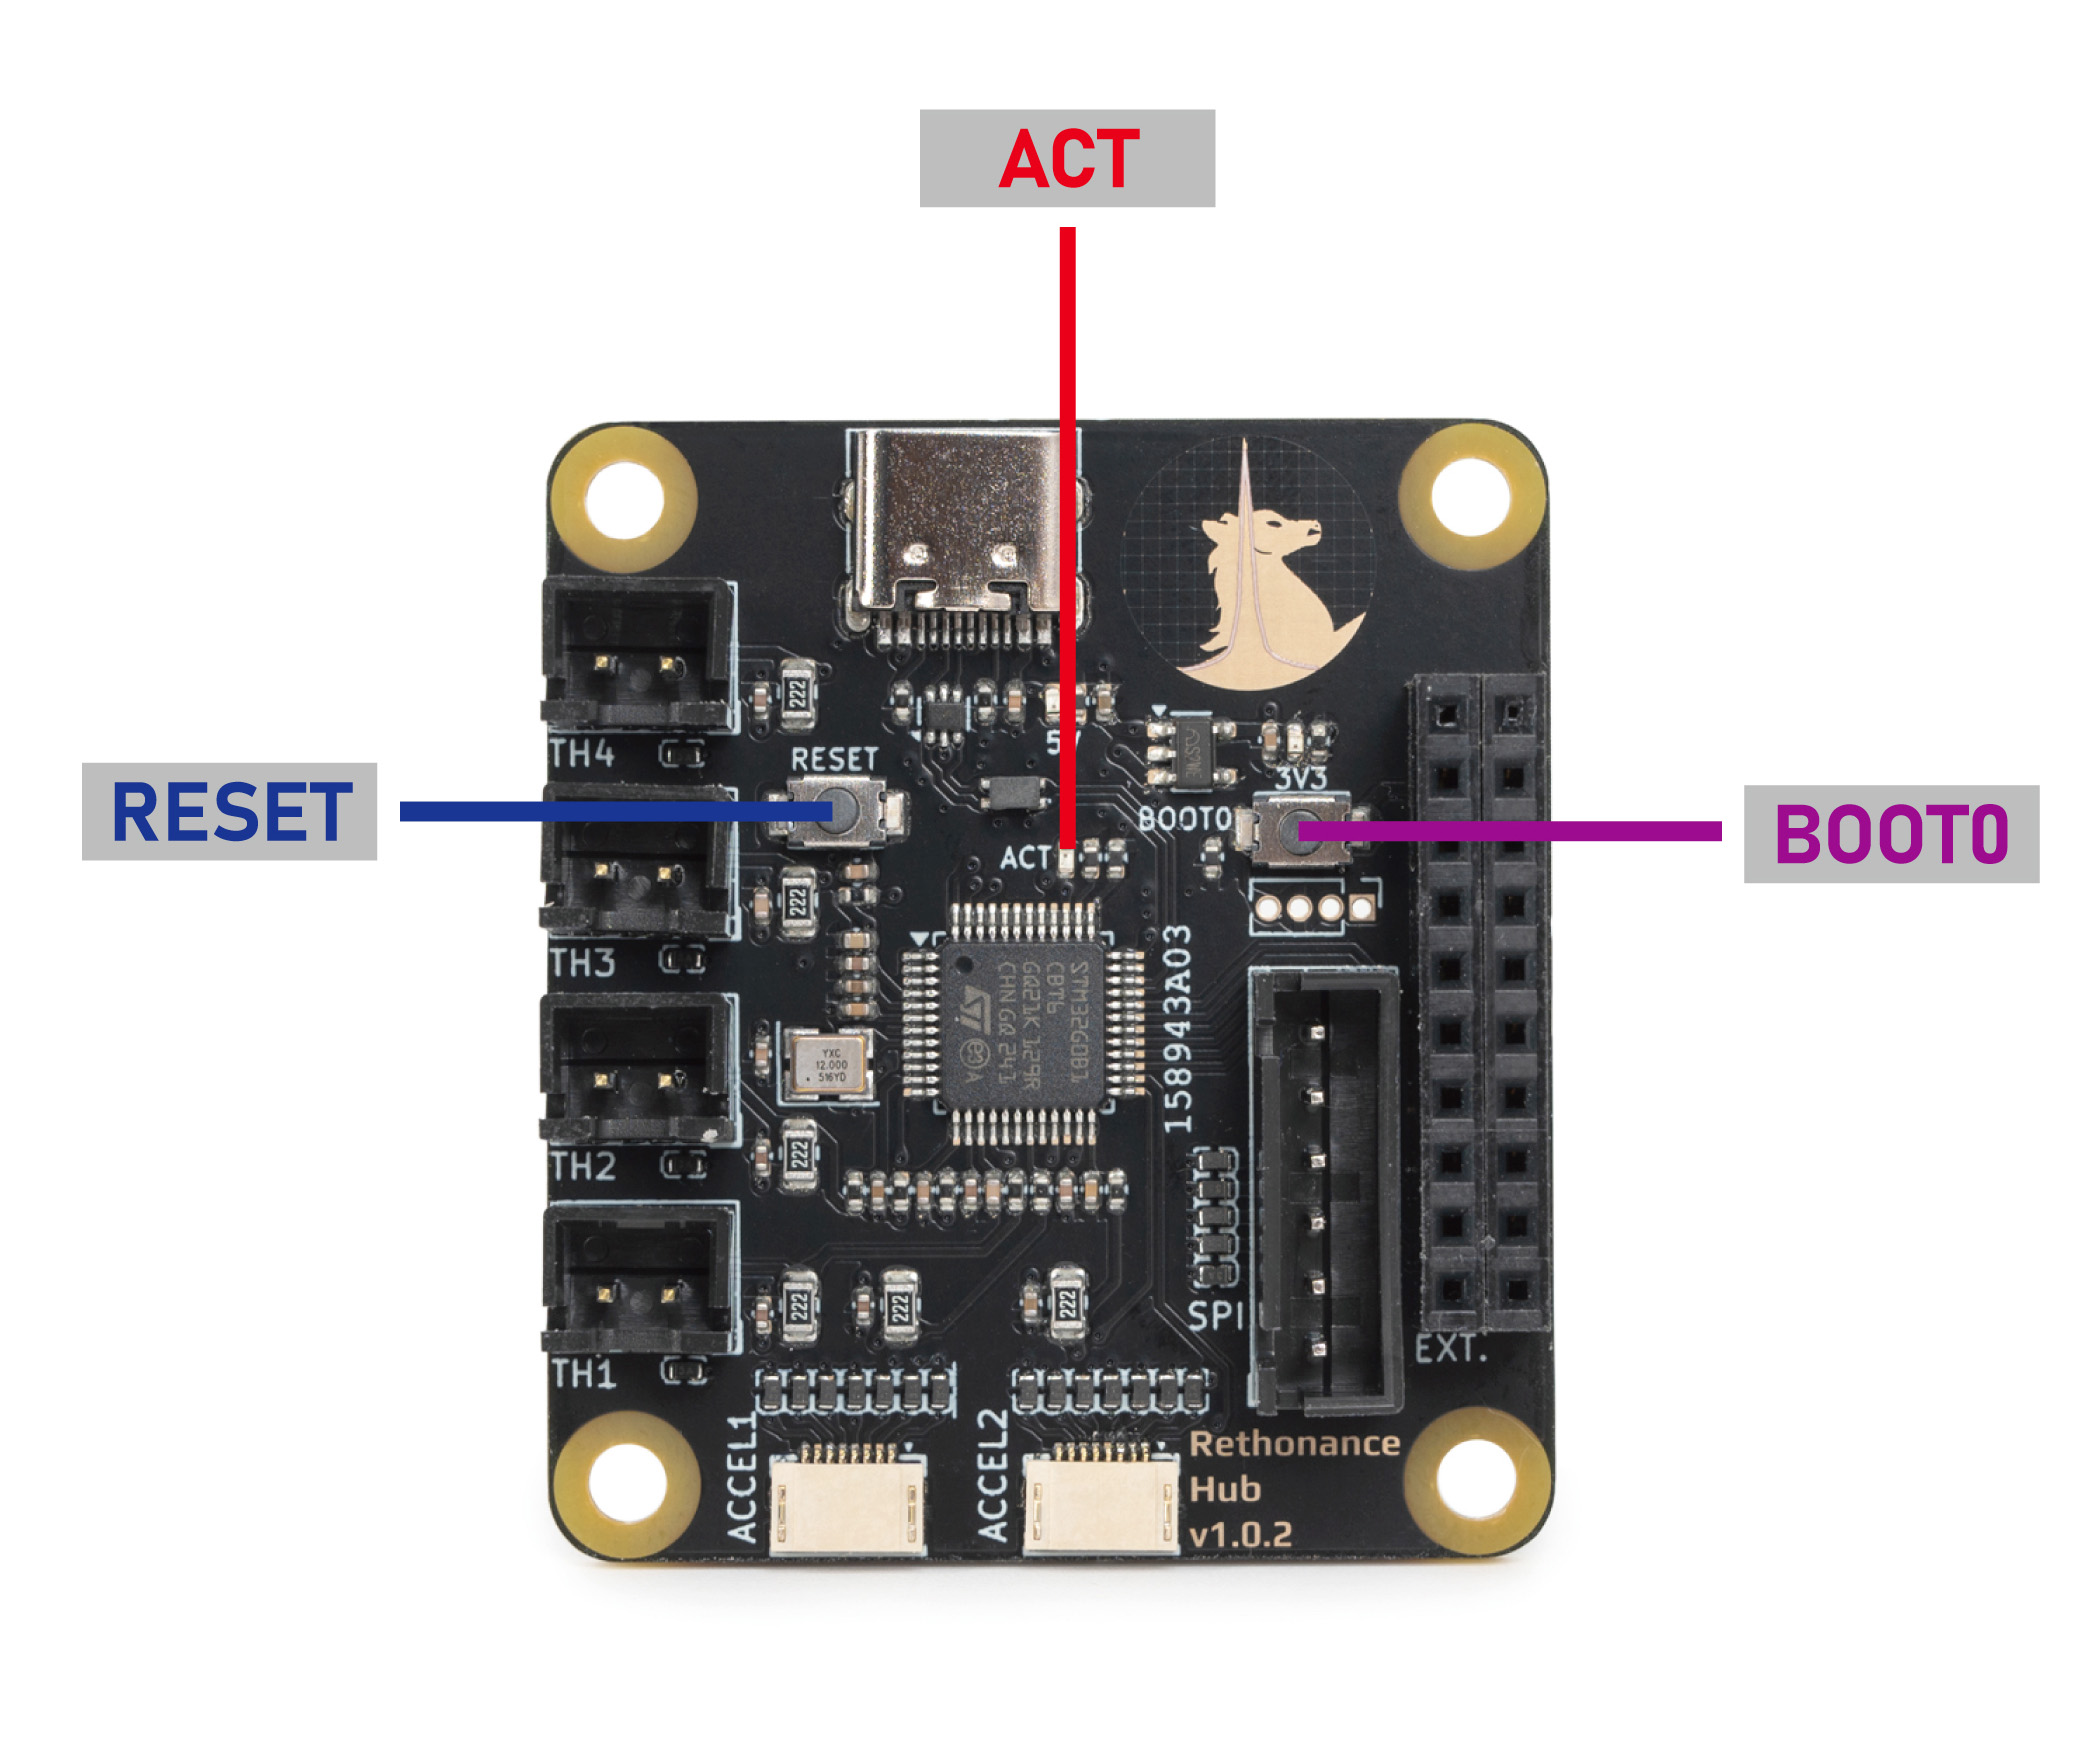
No special setup is required for installing either Klipper or Katapult. Rethoance Hub simply needs to be hooked up as it operates normally in your 3D printer. You also need access to the two buttons (RESET and BOOT0) on the board. Also note the position of the ACT LED, which will be important later. Reference the photo below to find the buttons and LEDs.
¶ Compiling Klipper Firmware
The following instructions are for compiling and upload new Klipper firmware to your Rethonance Hub. You need to perform these steps if you want to update your klipper firmware to the newest version or if you are doing a fresh install and just uploaded Katapult (see the previous sections). Before compiling the firmware, you will need to have Klipper already installed on your host device (e.g. Raspberry Pi).
- Log on to your Klipper host via SSH, windows users can use putty or any other SSH client. Mac and Linux users can simply connect with the
sshcommand in their command line terminal. Run the following commands to open the firmware configuration interface:
cd ~/klipper
make menuconfig
- In the configurator, Enable extra low-level configuration options, choose STMicroelectronics STM32/STM32G0B1, match the rest of the settings with the screenshot below:
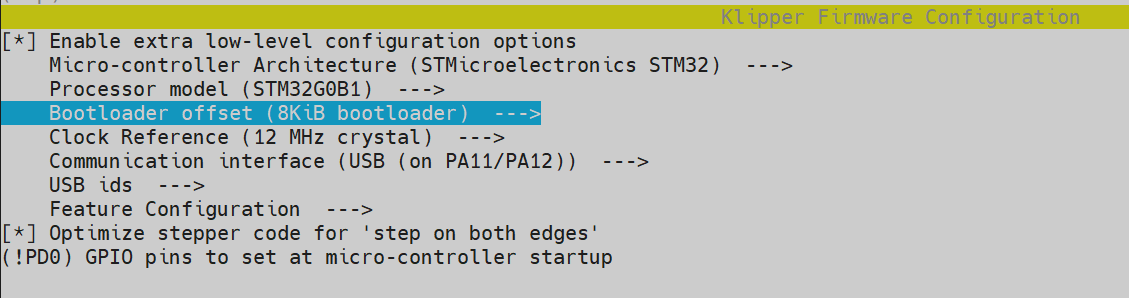
- Most importantly, make sure you set the
8KiB bootloaderoffset. Otherwise you will erase the Katapult bootloader! - Enter
Qto quit and confirm withYes when prompted to save. And run the following to generate the firmware file:
make clean
make
- A firmware file called will now be generated and can be located in the directory
~/klipper/out. You are now ready to upload this firmware to the Rethonance Hub. The recommended method is uploading via themake flashcommand.
¶ Uploading Klipper (via make flash)
- Run
ls /dev/serial/by-idto find the USB ID of your Rethonance Hub. The USB ID should have a format similar to this:usb-Klipper_stm32g0b1xx_1234567890000000-if00. - Run the following commands. This will install the
python,pip, and thepyserialpython module if it is not present. You may receive anerror: externally managed environmentwhen running the last command. This simply meanspyserialhas already been installed and you may move on to the next step.
sudo apt install python3 python3-pip
pip install pyserial
- Run the following commands to upload the firmware to the MCU directly:
cd ~/klipper
sudo service klipper stop
make flash FLASH_DEVICE=/dev/serial/by-id/<your USB ID>
sudo service klipper start
- If you encounter any connection issues after flashing the new firmware, reboot your printer. Your frame PCB should now have the newest firmware. If the flashing process failed, you may want to try using the the second method and upload Klipper via Katapult
¶ Uploading Klipper (via Katapult)
In this section we will use an alternative method to upload klipper firmware using the Katapult bootloader. If your Rethonance Hub is missing the Katapult bootloader for any reason, you should follow the next section to install it first.
- First we will check and install the Katapult package (if necessary):
test -e ~/katapult && (cd ~/katapult && git pull) || (cd ~ && git clone https://github.com/Arksine/katapult) ; cd ~
- To upload Klipper, we will use a Python script to communicate with the Katapult bootloader inside of the Rethonance. First, we will first need to setup a Python3 environment. Run the following:
virtualenv -p python3 ~/katapult-env
~/katapult-env/bin/pip3 install pyserial
- This creates a Python 3 environment in the location
~/katapult-env/and installs the modulepyserialwhich is required to run the upload script. - Now we must force the MCU to enter the Katapult bootloader and obtain the USB serial address. Start by quickly double clicking the RESET button, you should see the ACT light blinking slowly.
- Next run
ls /dev/serial/by-id/. You should see something likeusb-katapult_rp2040_A1234567898D1234-if00- note that the address contains the wordkatapult. If not, this means either your Rethonance Hub did not have Katapult installed or you did not enter the Katapult bootloader properly. Copy the address down for the next step, do not exit the bootloader yet. - Finally run the following but substituting the address with the one you obtained in the previous step. If everything was correct, you should see some write and verification progress followed by
Flash Successat the end.
~/katapult-env/bin/python3 ~/katapult/scripts/flashtool.py -d /dev/serial/by-id/usb-katapult_rp2040_A1234567898D1234-if00
- As a finally verification, run
ls /dev/serial/by-id/. you should see a Klipper USB serial address in the form ofusb-Klipper_rp2040_E1234567A12D9835-if00.
¶ Installing the Katapult Bootloader
In this section we will compile and upload the Katapult Bootloader. Note that your Rethonance Hub normally ships with Katapult pre-installed and you only need to perform the following operations if Katapult was inadvertently overwritten or lost.
- Login to the Raspberry Pi. We will check and download the Katapult package (if necessary):
test -e ~/katapult && (cd ~/katapult && git pull) || (cd ~ && git clone https://github.com/Arksine/katapult) ; cd ~
- Now we will configure need to configure some options:
cd ~/katapult
make menuconfig
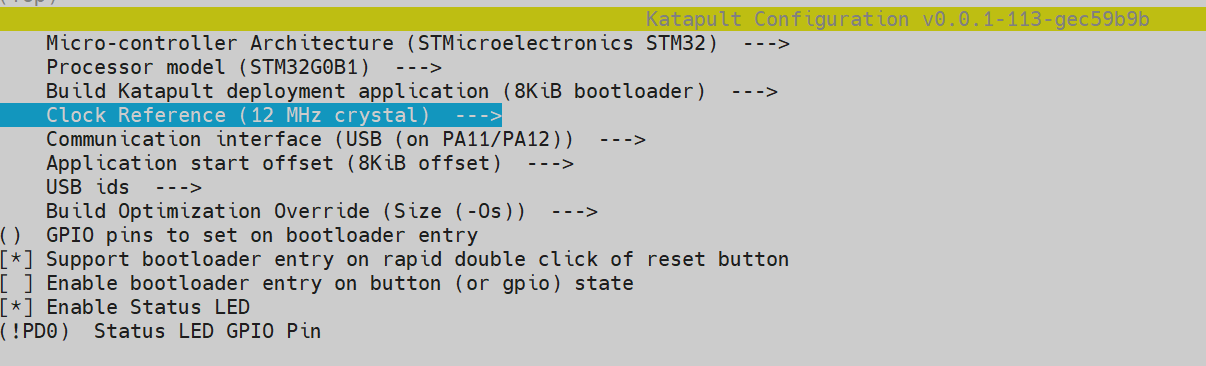
- This will bring us to the configuration menu. Make sure to set the options as below:
- Enter
Qto quit and confirm withYes when prompted to save. next run the following command to compile and generate the Katapult binary files:
make clean
make
- A binary file called
katapult.binwill now be created in the location~/katapult/out/. Our next job is to upload this file into the STM32G0B1 MCU. - We now need to reboot the MCU into system boot mode. This is done in three steps:
- Press and hold both the RESET and BOOT0 button.
- Release the RESET button
- Release the BOOT0 button
- If done correctly, your Rethonance Hub should now have entered DFU mode. Run the command
lsusbto confirm. You should see something likeBus 001 Device 023: ID 0483:df11 STMicroelectronics STM Device in DFU mode. If you did not get the previous output, this means either MCU didn't enter DFU mode or there is a problem with the physical connection between the Raspberry Pi and Rethonance Hub. - We are now finally ready to upload Katapult. Run following commands:
sudo apt install dfu-util
sudo dfu-util -a 0 -s 0x08000000:leave -D ~/katapult/out/katapult.bin If everything went smoothly, you should now be able to see the ACT light located below the BOOT0 button blink slowly. To double check that Katapult is installed, run ls /dev/serial/by-id. You should see something like: usb-katapult_stm32g0b1xx_A1234567898D1234-if00which is USB serial address of Rethonance Hub running Katapult. A few small details to note here:
- You will only see this address when the Rethonance Hub is in Katapult bootloader mode and not in system boot mode or when the Rethonance Hub is normally running Klipper.
- You can force the Rethonance Hub to enter the Katapult bootloader by quickly double clicking the RESET button on the board. The ACT light blinks slowly in this mode as previously mentioned.
- You will need enter the Katapult bootloader and the Katapult USB serial address to upload Klipper.
- By following the above instructions, you will have uploaded Katapult but erased all other firmware, including any previously installed Klipper firmware.
- Exit the Katapult bootloader by single pressing the RESET button, normally you would enter Klipper firmware. Since you just erased Klipper, you will just re-enter the Katapult bootloader.
- you are now ready to compile and upload Klipper - see the previous section here.