¶ Features
The Picobilical by LDO is a mod designed specifically for the Voron 0 printers. The Picobilical is based on V0-Umbilical by timmit99 and retains its original advantages while introducing new features:
NOTE: Soft Reboots of the Raspberry Pi will cause the Picobilical to disconnect and only a hard reset/power cycle will restore the connection.
Do not mix up Klipper configuration files, doing so may cause unintentional damage to your PCB or 3D printer. Use the Picobilical configuration files here.
- Rear mounted toolhead PCB simplifies toolhead wiring.
- The umbilical cable can be easily detatched from the toolhead - allowing the toolhead to be completely decoupled during maintenance.
- On-board RP2040 microcontroller frees up ports in the main controller while greatly simplifying wiring.
- Integrated 24V to 5V buck converter with max 5A output eliminates the need for an external 5V buck converter for the Raspberry Pi.
- Two independent neopixel ports.
- Selectable supply voltage (24V or 5V) for part fan and hotend fan.
- On-board thermistor for chamber temperature monitoring.
- Optional filament sensor input.
¶ Overview
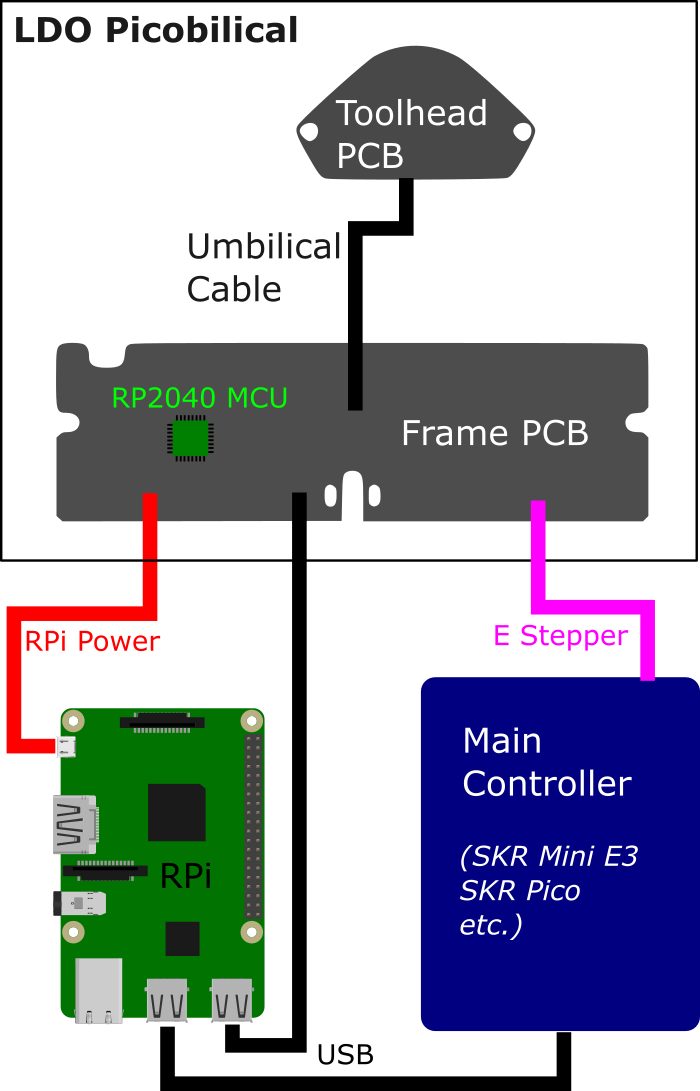
The Picobilical is composed of the Toolhead PCB, Frame PCB, and Umbilical Cable - which connects the two PCBs.
- The Toolhead PCB is a simple PCB that receives all the electrical connections on the printer toolhead and combines them into a single 14pin umbilical connector.
- The Umbilical Cable connects the Toolhead PCB to the Frame PCB.
- The Frame PCB is a secondary controller that processes all the signals from the toolhead PCB and communicates directly with the Klipper Host on the Raspberry Pi. This design simplifies electrical wiring because no connections need to be made to the main controller (except for the extruder motor). An additional benefit is that many ports on the main controller are now freed up, and can be used for other mods.
- The Toolhead PCB connection to the Input Shaper uses the included ribbon cable (not shown in the diagram). This connection is temporary when performing input shaping, the Umbilical Cable is not used for input shaping.

¶ Compiling and Uploading Firmware
The Frame PCB contains an RP2040 microcontroller that communicates directly with the klipper host on the Raspberry Pi. In order to acheive this, an appropriate firmware needs to be uploaded to the Frame PCB.
¶ Compiling the firmware
- Before compiling the firmware, you will need to have klipper already installed on your Raspberry Pi.
- Login to the Raspberry Pi and run the following commands to open the firmware configuration interface:
cd ~/klipper
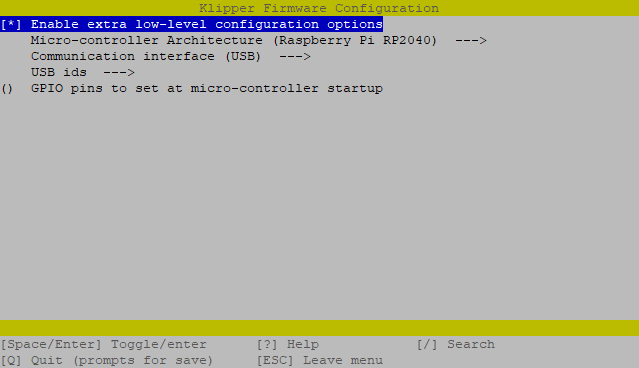
make menuconfigIn the configurator, Enable extra low-level configuration options, choose Raspberry Pi RP2040, and USB Communication interface:

- Quit the configurator (by pressing Q, save when prompted). And Run the following to generate the firmware file:
make clean
make A firmware file called klipper.uf2 will now be generated and can be located in the directory ~/klipper/out.
- An easy way to access this file is to copy it to a directory that you can access via Fluidd/Mainsail: (if one doesn't work then try the other)
cp out/klipper.uf2 ../klipper_config/klipper.uf2or
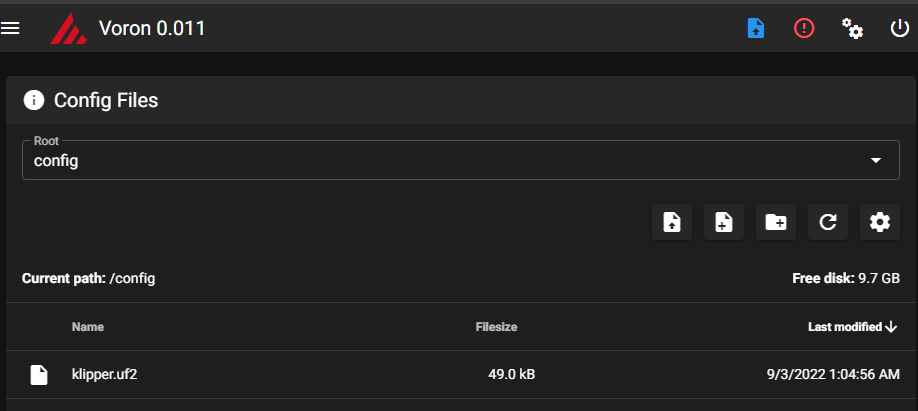
cp out/klipper.uf2 ../printer_data/config/klipper.uf2You can now download the file from the same interface used to access the config files:

¶ Uploading firmware
There are two methods for uploading the firmware. Using the UF2 Bootloader Mode, and Klipper Make Flash.
¶ UF2 Bootloader Mode
If your frame PCB has no klipper firmware previously installed, this is the most straighfoward way to upload the firmware.
- Make sure the USB power pins are shorted with a jumper on the frame PCB - this allows the mcu on this PCB to be powered from the USB port.
- Connect the frame PCB to any computer via the USB port. At this point, the power LED on the PCB should light up
- Simultaneously press down on the BootSel and Reset button, then release Reset first followed by BootSel.
- On your computer, the frame PCB should now show up as a removable drive. This indicates that the frame PCB successfully entered UF2 bootloader mode.
- Copy the klipper.uf2 firmware file into the removable drive. The removable drive will shortly disappear thereafter, indicating that the new firmware was successfully uploaded to the microcontroller.
- Remove the USB power jumper, as this can interfere with the normal operation of the frame PCB.
¶ Klipper Make
When you update Klipper on your Raspberry Pi, you may be required to also update the firmware on your controllers from time to time. This method is therefore more convenient if your frame PCB already has Klipper firmware installed and is already wired to the rest of the printer.
- Login to Raspberry Pi and run
ls /dev/serial/by-idto find the USB ID of your frame PCB. The USB ID should have a format similar to this:usb-Klipper_rp2040_1234567890000000-if00. - Follow the steps from compiling the firmware to make sure that the firmware configurator is setup correctly.
- Run the following commands, which will automatically compile, and then upload the firmware to the MCU directly:
cd ~/klipper
make clean
sudo service klipper stop
make flash FLASH_DEVICE=/dev/serial/by-id/<your USB ID>
sudo service klipper startIf you encounter any connection issues after flashing the new firmware, reboot your printer. Your frame PCB should now have the newest firmware.
¶ Klipper Configuration
Configuration settings for klipper can be found here. We've bundled the settings into a file which you can include at the end of printer.cfg.
¶ Port Definitions and Pin Connections
| Device/Port | Label - PCB | RP2040 Pin | Description |
| X Endstop | XES - Toolhead | gpio0 | Connects to the XES on the toolhead PCB |
| Hotend Heater | HE0 - Toolhead | gpio4 | Connects to the HE0 on the toolhead PCB |
| Hotend Thermistor | TH0 - Toolhead | gpio29 | Connects to the TH0 on the toolhead PCB. Uses a 2.2kΩ pull up resistor. |
| Part Fan | PCF - Toolhead | gpio2 | Connects to PCF on the toolhead PCB. The voltage level of the fan can be changed between 24V and 5V using jumpers on the PCB. |
| Hotend Fan | HEF - Toolhead | gpio3 | Connects to HEF on the toolhead PCB. The voltage level of the fan can be changed between 24V and 5V using jumpers on the PCB. |
| Chamber Thermistor | CT - Frame | gpio28 | On board thermistor, part number CMFB103F3950FANT. See here for thermistor definition. Uses a 2.2kΩ pull up resistor. |
| Motor | MOTOR - Toolhead/Frame | N/A | A pass-through connection that connects the motor on the toolhead to the stepper driver on main controller. |
| Neopixel 1 | Neopixel 1 - Frame | gpio1 | Connects to the Neopixel 1 port on the frame PCB. Independent from Neopixel 2 port. |
| Neopixel 2 | Neopixel 2 - Frame | gpio7 | Connects to the Neopixel 2 port on the frame PCB. Independent from Neopixel 1 port. |
| Beeper | Beeper - Frame | gpio5 | Controls a piezo buzzer on the frame PCB. The buzzer contains its own driver, so simply control it be pulling the MCU pin up for down for the duration you want. |
| Filament Sensor Input 1 | FS - Frame | gpio6 | Connects to FU on the frame PCB. Filament sensor input 1. |
| Filament Sensor Input 2 | SU - Frame | gpio18 | Connects to FS on the frame PCB. Filament sensor input 2. |
¶ Electrical Specifications
| Parameter | Symbol | Minimum | Typical | Maximum | Unit | Comments |
| Power Supply Input | Vin | 12 | 24 | 32 | V | power input for the entire frame PCB |
| 5V Voltage | Vrpi | 5.1 | V | voltage output for the 5V buck converter. Used by the Raspberry Pi, neopixels, fans(5V). | ||
| 5V Current | Irpi | 5 | A | current output for the 5V buck converter | ||
| Fan Current(HEF, PCF) | Ifan | 1.14 | A | current rating for each fan mosfet. The two part fan ports share a single mosfet. | ||
| Hotend Current | Ihe | 5 | A | limited by max. continuous current of mosfet |
¶ FAQ
What are the main differences between the Picobilical and the original V0 Umbilical mod?
- The toolhead PCB uses a screw terminal for connecting the hotend heater instead of the original JST-XH connector. The polarity of the fan connectors are also reversed in the LDO toolheadPCB - This brings its polarity in-line with hartk's toolhead PCBs, as well as the default polarity of most fan connectors. The Frame PCB is heavily modified and features lots of extra electronics (see features)
I already have the original V0 umbilical mod, can I reuse it?
- Yes, the 14pin connector and its pinout is 100% compatible with the original V0 umbilical mod. So in theory, you should be able to reuse the toolhead PCB and the 14pin umbilical cable.
What material is the umbilical cable made of?
- The 14pin umbilical cable uses high strand count UL1332 FEP cabling, most of the wires are 24AWG gauge while some of the current carrying wires are 18AWG gauge.
I use an Orbiter / LGX Lite / Sherpa Mini extruder instead of mini Afterburner, can I use this mod?
- Yes, since the original Mini Afterburner, Orbiter, and LGX Lite extruders all use the same stepper motor (or at least the same form factor). This mod should be compatible with those extruders.
The replaceable fuse on my Picobilical blew, what are the specs and where can I get a replacement?
- The fuse used on our picobilical is a 7A slow blow type, you can get replacements here. Other brands are also acceptable, as long as it has the same specifications and dimensions.