¶ Build Notes
This build note will help identify variations from the Official Voron Trident Assembly Manual as of July 18, 2023, to avoid issues changes to the official manual such as page number changes we recommend using our link to the correct version for these notes. We tried our best to capture all of the changes. Please let us know of other changes you discover via our channel #ldo_motors on the Voron Discord Server
NOTE: Due to the tight tolerances of the extrusions and roll-in t-nuts it is advisable to either test fit before assembly to identify the sides of the extrusions that fits the best or to pre-load the t-nuts into the extrusions.
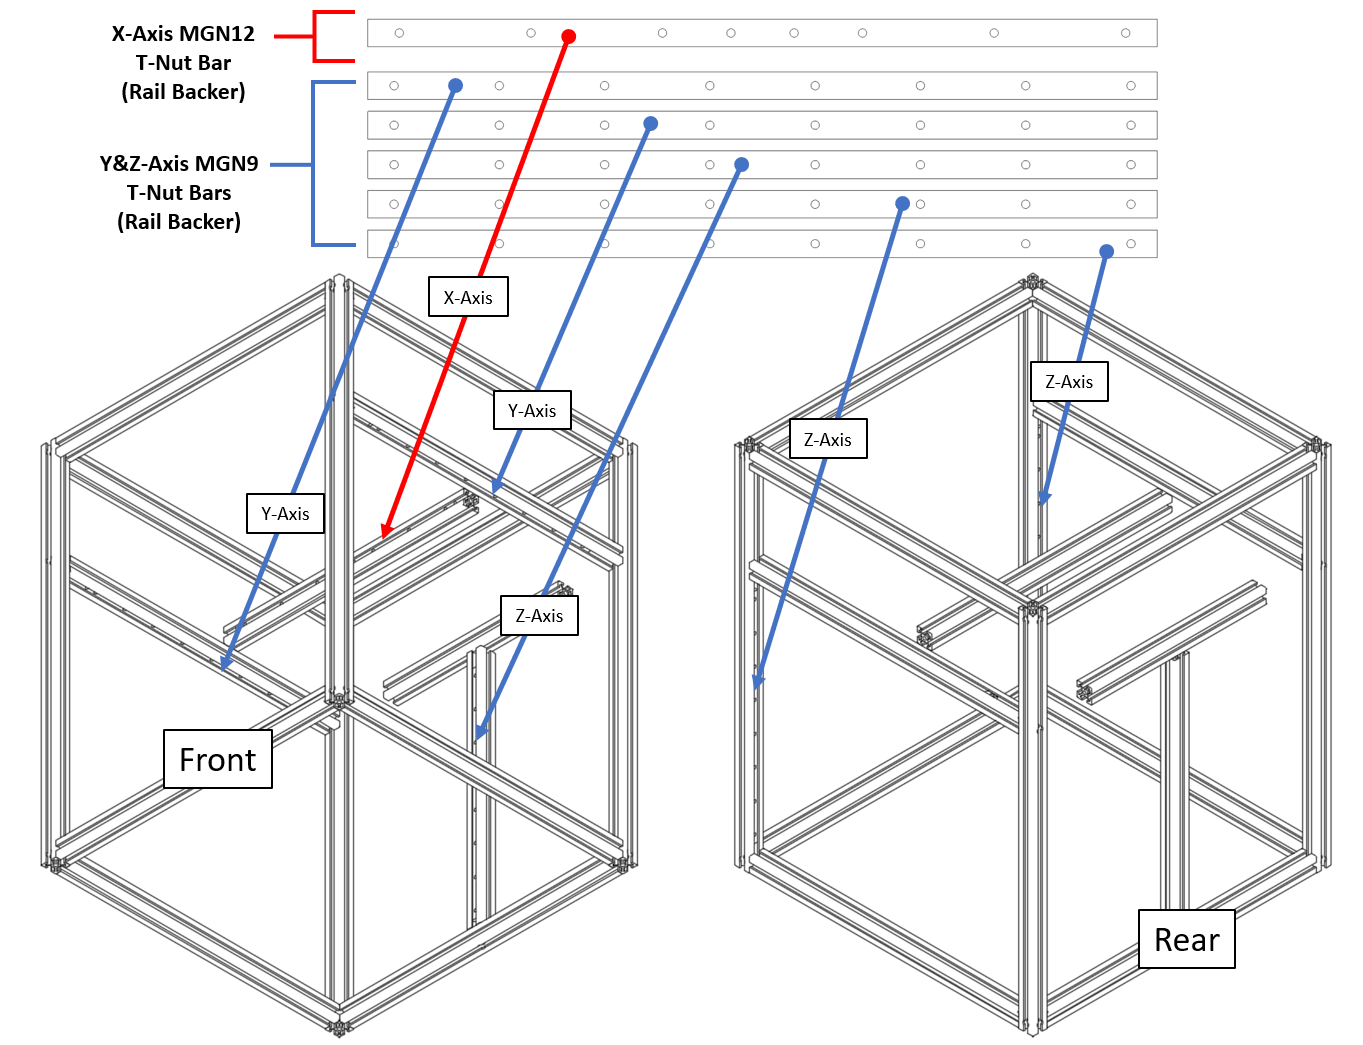
*** IMPORTANT *** - Preload T-Nut Bars for rails (watch the Maple Leaf Makers video for preloading for the 250 build. But for 300 build please note that the bottom extrusion will have different regular T-nut placements .) The video shows to pre-load the regular T-Nuts but it is NOT necessary.
PAGE 8 The brass M5 Precision Spacer are used in place of the M5 Shim. This will be for all M5 Shims in the guide unless noted.
PAGE 14 For the LDO 300 Cube build the H Extrusion 380mm in length which as one end tapped and the E Extrusion is also 380mm without any tapped ends.
PAGES 17-20 The kits uses T-Nut Bars into place of the T-Nuts for mounting the rails. They need to be pre-loaded as you assemble the frame, since they CANNOT be inserted afterwards. Also, note that the X-Axis T-Nut Bar has different holes compares to the others. Look ahead in the manual on mounting the rails to help clarify the orientation of the T-Nut Bars.
Note: the 250 T-Nut Bars (shown below) differs from the 300 T-Nut Bars. Use the one that is different from the others for the X-Axis for both sizes.

PAGE 48 SKIP The kit does not use hall effect endstops
PAGE 79 You can find the Leadbolt nuts attached to the leadscrews in the Z Linear Motor box.
PAGE 81 The POM nut is oriented so the flange extends into the part and the accented part is flush. The POM nut should be able move freely, otherwise the lock nut is too tight.

PAGE 82 The POM nut should be able move freely, otherwise the lock nut is too tight. Print this Z carriage rear to be compatible with our cable chains.
PAGE 135 Use M3x25 wafer head screw instead of the M3x30 SHCS for the inductive probe
PAGE 140 Remove the protective plastic film from the bed. After applying the magnetic sheet, carefully trim the holes for mounting the bolts on Page 158.
PAGE 141 SKIP The heater pad is already pre-applied
PAGE 142 SKIP The heater fuse is already pre-installed
PAGE 143 Use the M4 screw rather than the M3x6 SHCS and serrated washer directly fastened to the aluminum plate - this is where you attach the bed PE (protective earth) cable to ground the build plate. Remove the serrated washer from the aluminum plate, this will be used later to attached the ground wire to the frame. The cable is found in the Power Cables bag labeled BED PE.
PAGE 144 Use the LDO Z endstop printed part and PCB. See the wiring guide for your specific printer for details
PAGE 145 Follow only the installation of the 5mm Shaft
PAGE 146 Use the LDO bed connection printed part. See the wiring guide for your specific printer for details
PAGE 147 The bed frame extrusion will vary from the 175mm showing in the guide. For 300 build the size will be 200mm from the edge on the center extrusion.
PAGE 158 Use M3x20 SHCS for bed mounting
PAGE 159 Use M3x25 SHCS for probe mounting
PAGE 162-163 The Trident Kit supports the build of the Stealthburner + Clockwork 2. Follow the assembly of Stealthburner manual and also Stealthburner + Clockwork 2 follow our guide here.
PAGE 165 Use the LDO Z chain anchor
PAGE 168 Use the LDO right deck cover
PAGE 170 The LDO deck panel has a 4mm nominal thickness, use deck_support_4mm instead of its 3mm counterpart. 6 pieces are needed, if you follow our 250 wiring guide.
PAGE 173 Follow the orientation according to the build size 250mm(Rev.A/C) and for the 300mm((Rev.A/C)). If your kit is Rev. D, then pls follow this link.
PAGE 181 Use the LDO Beefy Raspberry Pi Mount
PAGE 183 SKIP The kit uses the Octopus to supply the 5v power for the Raspberry PI
PAGE 188 Use the LDO plug panel. See the wiring guide for your printer for details
PAGE 191 SKIP. See the wiring guide for your specific printer for details
PAGE 195 SKIP The kit uses the Octopus to supply the 5v power for the Raspberry PI
PAGE 198 SKIP The kit uses the X/Y Endstop PCB board
PAGE 208-212 SKIP The kit uses a combined inlet and other changes. See the wiring guide for your specific printer for details.
PAGE 213 Use two M3x6 FHCS since the included cable chain ends has 2 holes. Follow this link for cable chain guide. Pay attention that the top of the cable chain ends needs to be reversed.
PAGE 215-219 SKIP The kit uses different electrical components. See the wiring guide for your specific printer for details and LDO Toolhead Wiring Kit
PAGE 220 Use the extrusion slot covers for the B motor wires, so zip tie loops are optional.
PAGE 222-223 When running wires in the cable chain, it is important to keep the wires loose. Pulling the wires tight inside the cable chain will result to excessive wire fatigue and possible pre-mature wire breaks.
PAGE 224 SKIP The kit uses toolhead PCB
PAGE 226 Use two M3x6 FHCS since the included cable chain ends has 2 holes
PAGE 231 Use M3x10 SHCS instead M3x8 SHCS for the gantry cover
PAGE 232 Use the cable sleeve for the wire bundle.
PAGE 240 SKIP The kit uses Touchscreen with KlipperScreen
KlipperScreen - To install the software follow the direction on https://github.com/jordanruthe/KlipperScreen/blob/master/docs/Installation.md
- Use Identifier "DPI-1" for the configuration
- Users who received the Waveshare touchscreen, print this mod to install your touchscreen display.
- Users who received the BigTreeTech touchscreen, print the mount from here.
- Use this guide to rotate the screen
PAGE 242-244 SKIP The kit uses KlipperScreen
PAGE 247 SKIP The kit uses KlipperScreen
PAGE 257 SKIP The kit uses different electrical components. See the wiring guide for your specific printer for details
PAGE 276-281 SKIP Please follow our guide for Nevermore mod here
PAGE 282 SKIP The kit uses different electrical components. See the wiring guide for your specific printer for details
¶ FAQ